

Blog's Category: International, My Staple Food, USSR-era Recipes
Plov


Intro
Plov, or call it pilaf, is very popular in Russia, Ukraine or anywhere on a territory of the former Soviet republics. It even served in all Russian restaurants here, in US.
A bit of history - when I just stepped in my twenties, I took my first, very memorable vacation to see Issyk-Kul lake, in Kyrgyzstan. FYI, Issyk Kul lake is a second largest salt lake in a world. While I brought a lot of beautiful pictures of Tian Shan mountains, forever imprinted in my mind, I also have learn, from a very nice lady I roomed at, an authentic way of cooking plov. Since then, I tried and rejected many different ways to make plov. Just this one stays firm as a simplest, the most delicious and flavorful plov I ever tried.
What is Plov
It is Middle Eastern staple, same as pilaf or pilau. It is rice cooked with meat (often it's lamb) with addition some spices (different combinations of cumin, coriander, turmeric, peppers) and some vegetables, such as carrot, onion and garlic. Often lentils, chick peas of beans are added sparingly. Traditionally, a lot of fat used to cook plov. I use flavorless olive oil.
Distinct characteristic of this plov is using half-peeled garlic. Don't be too shocked, just try it and you never ask any questions "why".
Taste Description
Rice, infused with a spice-flavored oil, is a real star in this dish. Its a base of a plov. Anything esle would be pointless here without rice.
Meat is soft and juicy, coated in a pasty mix of cooked onion, carrot and spices. If you are not big fan of cooked carrot - don't be discouraged, carrots questionable taste nuances are wonderfully transformed and mixed with cooked onion into yummy sauce/ paste. Just small bright specks of carrot will remind you about its presence. Cumin and coriander, laid onto a natural flavors of rice, meat and vegetables, create a unique, distinct flavor of plov that everybody, who tried it once, craves again and again.
Garlic, cooked inside of its skin, while getting its portion of all beautiful spices and oils of plov, keep its adorable roasted garlic taste and identity - it's a little jewels of plov.
How to Serve and How to Eat
Serve hot with some pickles or fresh tomatoes on a side to curb a richness of plov. Traditionally, plov is eaten by hands - as I heard, you have to use your three fingers to do this. I never tried it, but feel free to be adventurous :) Although you will need your bare fingers to eat garlic (my favorite part of plov): separate clove from a head with your hands and, holding on a tail end of a clove, bite on it and squeeze that awesome garlic pulp from a garlic shell right into your mouth.
Plov

For a large, 5-liter, family-size pot of plov:
- 2 onions, chopped
- 2 large carrots, shredded
- 1/2 cup flavorless (light) olive oil
- 2 lb boneless skinless chicken thighs, chopped in small pieces approximately 1"x1" (use other meat of your choice: lamb, beef or even pork!)
- 6 cups jasmin rice (or rice of your choice)
- 2-3 tsp salt
- 1 tbs cumin seeds (or ground cumin)
- 1 tsp ground coriander (optional)
- 1 tbs red pepper flakes (optional)
- 1tsp freshly ground black pepper
- 5 garlic heads
- Prepare garlic by peeling off outer skin of garlic head without taking it apart into cloves. It's easy to do by rubbing garlic head with your fingers. See picture below.
- In a large pot, rinse rice in several waters (change water 5-7 times). Drain water off (I use mu palm to do it) and set rise aside.
- Prepare your meat, onion and carrot and set aside.
- In a large pot (at least 5-liter volume), heat olive oil, then turn heat to medium low and cook cumin seeds for about 2-5 minutes or until they release their great aroma and infuse the oil with this flavor. If you use ground cumin, skip this step and go to the next one.
- Add onion and cook it stirring occasionally until onion cooked through and just starts to get tan. It may take up to 5-7 minutes.
- Add carrots, chicken pieces, 1 tsp of salt, peppers, ground cumin and coriander (if using) and cook it, stirring occasionally, on a medium heat, until chicken pieces lose their pink color (about 10-15 minutes). If it starts to scorch in a bottom of your pan, switch heat to low - chicken will release some more juices and you'll be fine. While your chicken is cooking, boil whole kattle of water and have it ready for the next step.
- Pile your rinsed rice on a top of chicken (do not stir in!) and spread it even over the meat layer. Sprinkle your remaining 1 or 2 tsp of salt on a top.
- Take your garlic and stick ("plant") it into your rise. Even up a rice surface again.
- Softly, trying not to disturb layers, pour hot water from a kettle over the rice until water level will be 1" above rice level. Don't be scared by these not very presize measures, just remember that it's better add less water than more.
- Turn heat up. When water just starts boiling, turn heat low to keep water slowly boiling.
- When rice will expand to a water level (see picture, it happens in about 5-7 minutes), turn heat to the very lowest setting, cover completely with a lid, hit your timer to 15 minutes and forget about your plov for the same 15 minutes :) In 15 minutes - it's done!
- Come up to your stove, take a pick under a lid - rice is pretty, but nothing looking too special..wait... if you are same impaitient as me, get lid off, take a large spoon and dig in - spoon some rice on a plate, fish out garlic head and set aside for now, reach to the meaty bottom layer and spoon this goodness over your rice on a plate. Top it with a head of garlic and remember that the biggest challenge here is a fare distribution of garlic between current and future servings :)
Some Notes
- Traditionally, large cast iron round-bottom pot, called "kazan" is used for making plov. But I never had it and all my life was making plov in my regular stainless steel pot. Feel free to use dutch oven if you own one.
- All ingredients listed (with or without optional ones) are must to produce great plov - so act accordingly!
- Best meat for the plov is chicken, IMHO. But if you like to use other kind - be adventurous, go on.
- Some authentic recipes for pilaf restrict use of long grain rice. I have tried different kinds of long and short grain rice for this recipe. Conclusion - there is no critical difference here. So far my favorite is jasmine rice hence its name- it's very aromatic, nice looking and perfectly textured rice for this recipe. Using short grain rice will give you more sticky pilaf, basmati rice will be too dry, therefore jasmine rice is just exactly what we need - not too sticky, not too dry.
*******************************************************************************************************************************
IN PICTURES

I decided to go this time without coriander so the final taste will be somewhat softer flavor that with coriander but still great one.


The last water for rinsing has to be 89% transparent (:)


It's late spring here so garlic want to grow... Nevertheless..use it - let's count it as a sprouted healthy food.

Don't burn cumin seeds over the high heat. Let it oil be infused with cumin on a medium-low (it has to peacefully sizzle)

A lot of onion = a lot of sweet onion flavor so don't skimp on it..


whenever recipe asks for red pepper flakes, I use oriental type of crushed red chili pepper, it's milder that regular flakes speckled with pepper seeds, and also it brings more color and flavor to a dish. I buy it in Asian stores in a large bag - it lasts for me for a while - sometimes I even sprinkle it over food right before serving.


Chicken is not quite cooked yet but already has lost its pink.. Turn pot with rice over to add rice.
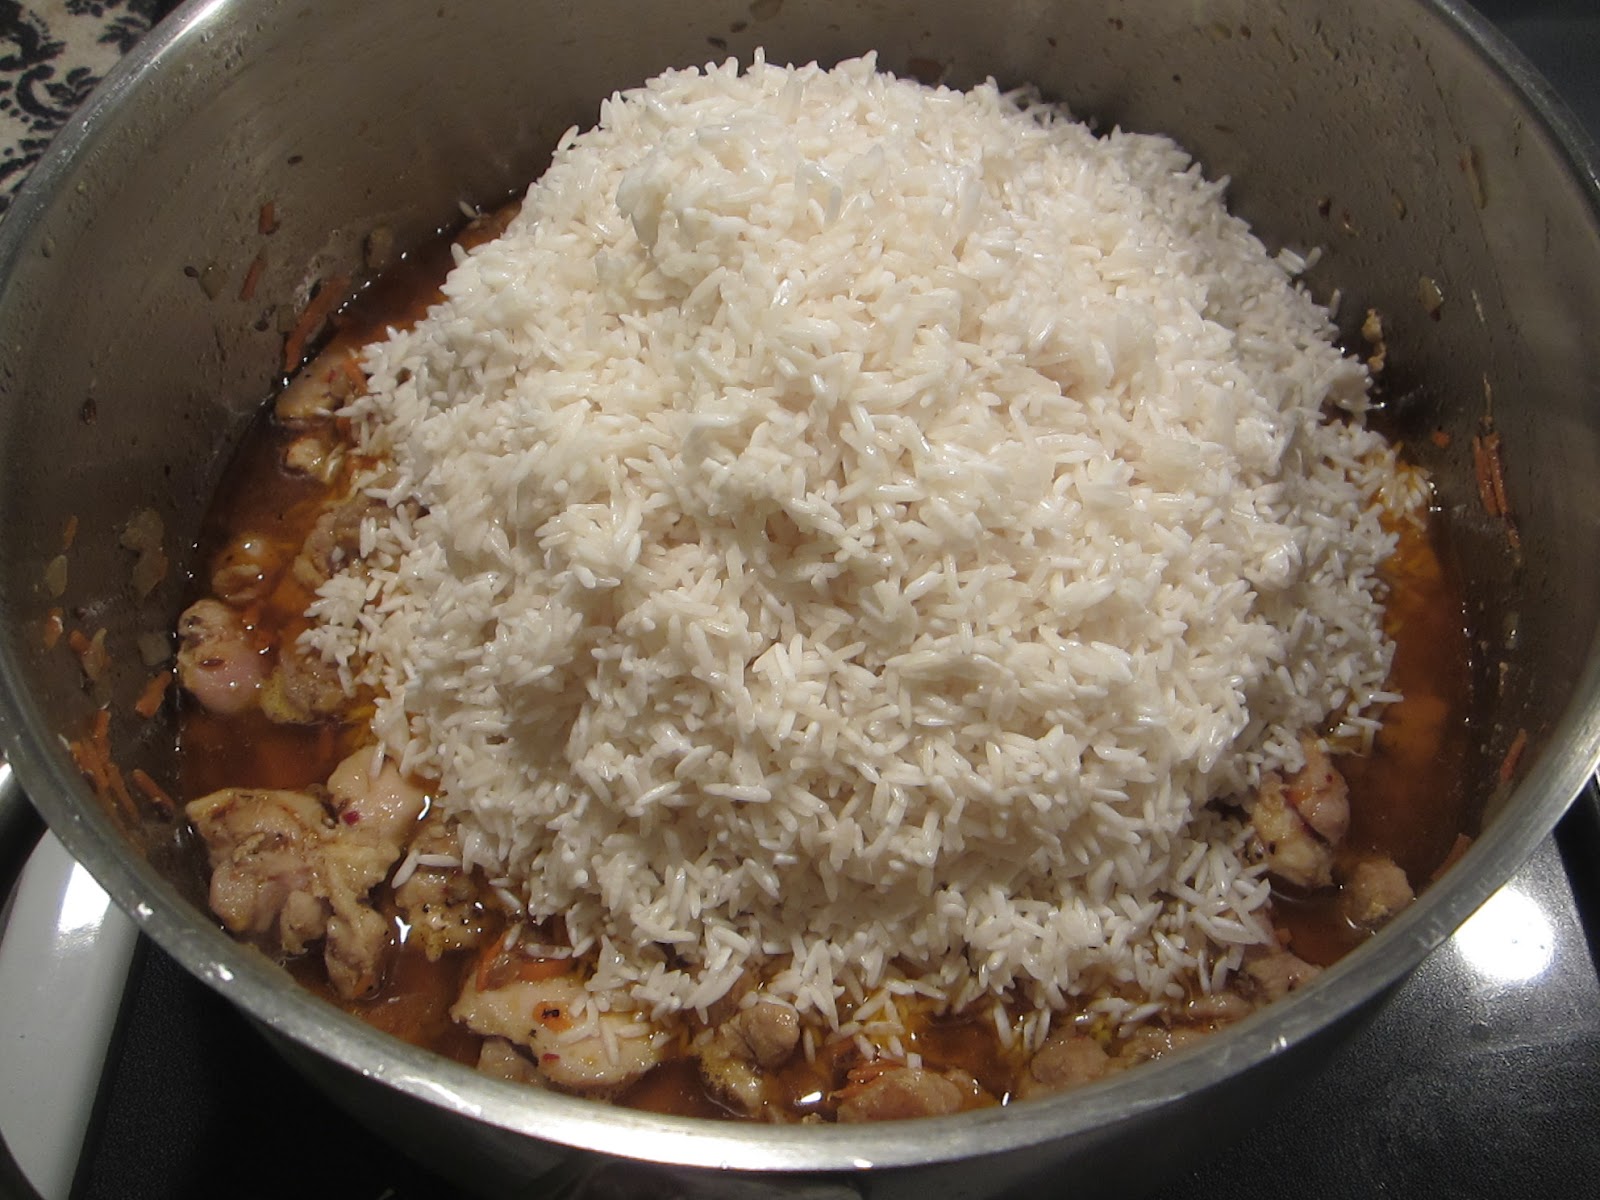
remember, no mixing up...just even rice out on a top of a meaty layer

"Plant" garlic bulbs into rice, carefully twisting them in.

:) pretty :)


I used 2 teaspoons (total) of salt for a whole 5-liter pot of plov and it come out slightly, just slightly, under-salted just the way I wanted. Add a bit more salt if you don't like under-salted food.

It's a hot water goes in (at the left)...

it's a thin layer of carrot-colored spice-infused olive oil on a top of water - it will coat with flavor each rice grain while soaking in.

let it boil with a medium-low intensity to do not disturb the layers.

as almost all water disappeared from a surface, time to confine the steam and finish up the cooking - time to cover with lid and turn heat to lowest.


It looks nothing special, right.. I wish you could sense the smell though..

Just dig in - under "pacific" rice layer seats juicy, full of bold tastes chicken-y goodness.

Shortly, this demo plate was gone as a "second", taken by my dearest-half seeing here in a background, working on his "first" for now.


