Wednesday, January 30, 2013

Soft-Bone Sardine Stew

Blog's Category: International, USSR-era Recipes, My Staple Food

Soft-Bone Sardine Stew

Intro
Yes! It is THAT recipe I have good memories about. I was browsing through my old cook books and come across the recipe of sardines that I cooked many years ago. I remember how good they were and for years, on and off, I, unsuccessfully, was trying to recreate those melting-in-your mouth sardines. Here it is, here is this recipe from "Jewish-Style Cooking" cookbook (in Russian). And here are those sardines - pretty, gold-colored, flavorful, with undetectable bones and non-existing anymore fishy taste which always was deterring me from this full of health benefits fish.

Variations
- I would recommend to stick to this recipe word-to-word as none of my previous attempts to cook sardines in even slightly different fashion was as good as this particular recipe.

Although I'm not done experimenting with sardines... and want to try something similar but based on  tomato sauce. I'll let you know if something good will come out of this.

Taste Description
First of all - there is NO bones and NO fishy aftertaste. Of course, bones are still there but after long cooking process they become very soft to the point of non-existence. Sardines itself are very "meaty" and soaked with their own flavors mixed with sweetness of onion-carrot base. Sauce is delicious, onion and carrots has the same unified, softly spiced taste and great aroma.


How to Serve

I like it cold or at room temperature, served as an appetizer or dish on its own, with a nice crusty piece of country bread.  Also it can be served warm, over pile of rice or any kind of pasta.
Store in a glass container in a fridge for 4-5 days.

Soft-Bone Sardine Stew

For about 20 sardines:
  • 2 large onions, peeled and sliced (skins saved)
  • 3 large carrots, peeled and sliced
  • 4 bay leaves
  • salt
  • freshly ground black pepper
  • 2 tbsp red peppercorns ("very" optional)
  • 1-1.5 cups olive oil
  • 2-4 cups of water

- Clean your sardines: cut off heads, remove guts and wash off scales (sardine scales are very easily removable simply with the tips of your fingers). Leave a beautiful shiny sardine skin on.

- In a bottom of a large skillet with lid (or dutch oven), place half of the onions and carrots. On a top, pack tightly all of your sardines in one layer. Generously sprinkle with a salt and ground pepper. Distribute remaining onions and carrots on a top of fish. Throw bay leaves, red peppercorn and pile up your onion skins on a top of everything.

- Pour olive oil and water over, bring to a boil on a high heat. As it starts to boil, turn heat to the lowest setting, cover tightly and simmer for 6-7 hours (yes, this long :)). Take a look couple times to make sure it is boiling in a "barely alive" manner. Other than this, it does not require your attention at all.

- When it is done, let it cool down a little bit, remove and discard onion skins, with a flat tong transfer sardines in a glass container and store in a fridge for your everyday enjoyment, it should keep at least for 4-5 days. I hope you enjoy it!

*********************************************************************************************************************************
IN PICTURES

Here it is, this lovely cook book "Jewish-Style Cooking" where I re-discovered my favorite sardine recipe. Too bad there is no pictures in this book whatsoever...:(


Save the onion skins. They will give lovely golden color and additional aroma to sardines.

It's fun to clean sardines - easy and pretty.


Pack in a pot or deep skillet in a head-to-tail, back side up fashion. Again, pre-e-e-tty!


I wish red peppercorn would give away more its lovely aroma... So red peppercorn is totally "omittable" here.

It seems to be a lot of olive oil but do not hesitate..trust me

water and oil should cover sardines (barely covering onion layer)

It is launched for a long 7-hour run.


In a couple of hours I pat onion skins down, just a little bit.


It is done! Quick test - oh, deliciousness!

Discard onion skins..

All the best edible part is left.


Monday, January 28, 2013

Guilt Free Biscotti

Blog's Category: My Staple Food

Guilt Free Biscotti

Intro
I make this biscotti often. Whenever I crave something baked, sweet for my tea-time or if I need to supply my college student with some healthy and long-lasting treats - I turn up to this recipe. I have to mention the best part of the recipe - it is super easy, just mix everything together, no chopping, no fridge timeouts and it's also fat-free not counting of course fat-containing nuts which are good for you anyway. Turned out it is my favorite cookie/pastry thing. Give it a try and you will see why it is so.

Variations
- Use nuts and dry fruits that you like. Try to stay away from fruits that are too dry (or soak them previously and then pat dry nicely). Also I stopped using  figs in this biscotti because they give "sandy" crunch to it which most people don't like (though I love dry figs by itself!).

Also you can substitute part of fruits or nuts with chunks of chocolate. As well, you can substitute part of whole wheat flour with a ground flax seeds (or another ground seeds you like).

Taste Description
These biscotti is perfect on a sweetness level - not too sweet but sweet enough to go well with a cup of sugar-less tea or coffee. Depending on the nuts and fruits used, you will experience waves of different flavors and textures.

How to Store
It can be stored in a container, at room temperature, for several days. It may harden up a little bit but still be good. As baked, I like to cut it in 1.5" squares and have it handy whenever I need little "something" for my cup of tea of coffee.

Guilt Free Biscotti

For about 20 small biscotti:
  • 2 eggs
  • 1 cup brown sugar
  • 1/2 tsp salt
  • 1/4 tsp soda
  • 1/4 tsp baking powder
  • 2 cups dry raw fruits (apricots, raisin, cherries, cranberries, etc.) whole, not chopped
  • 2 cups nuts (walnuts, almonds) whole, not chopped
  • 1 cup whole wheat flour
  • 3/4 c unbleached all-purpose flour
  • 2 tbsp brandy
  • vanilla extract
  • olive oil (optional) for oiling baking sheets.
- Preheat oven to 350F.

- Mix flours, salt, soda and baking powder together and set aside.

- Whisk together eggs, brown sugar and vanilla extract. Add nuts and fruits to the egg mixture. Stir.

- Add flour mixture to the egg/nuts/fruits mixture. Stir to combine everything nicely. Add brandy, stir again. You will get somewhat thick mixture (well, mostly nuts and fruits with specks of dough :)).

- Cover baking sheet with a foil or parchment paper. Oil lightly with an olive oil. With your hand still oily, distribute dough mixture on a baking sheet in a thin, about 1/2 -1 ", layer.

- Bake for about 20-30 minutes or until your biscotti sheet is brown, has risen up and toothpick comes out dry.

- Remove from the oven and let it cool down for 10-15 minutes and then cut in a 1.5" squares. Enjoy!

*********************************************************************************************************************************
IN PICTURES


This time I used filbert nuts and almonds, apricots, cranberries, raisin and figs (which I regret  - those were tough, dry and "sandy" to a tooth). Nevertheless, biscotti disappeared quickly and I have just memory of them right now :) 

I wasn't accurate in flour measurements this time and got too much flour (so, stick to the recipe please). Biscotti were a bit tougher because of this but still very good.

Also, I didn't have brandy - used peach schnapps..still good :)


It's a bit messy to get it on a baking sheet - do not try to be too presize layering the dough. It will expand and make itself more even.

Ready to go to the oven

.. and out of the oven

Cut it up using sharp thin-bladed knife.


Friday, January 25, 2013

Salt Cod Pate

Blog's Category: My Own Fast and Easy, My Successes,

Salt Cod Pate

Intro
I finally got my hands on a salted cod which was sitting in a fridge for a couple of months already. 
Heavily preserved with salt (it's really, really s-a-l-t-e-d), it can lasts actually much longer. Indeed, if I would be the bacteria I could not survive in THAT amount of salt incrusted into cod's flash there  :) .
I come across "Brandade de Morue" recipe in my French cuisine cook book. It's essentially pate made of salted code with olive oil and milk or cream. What happens rarely - I followed the recipe word to word and was very pleased with results. 
Another story was to decide what to pair this pate with and I think I've found some good combination of pate and "whatever" - check it out below. My final words on Brandade de Morue: it's very decadent and delicious (for me), but not so much for everybody. I guess it is that kind of food people either love or hate.

Variations
- There is not so much variation to the dish - some recipes call for milk instead of cream, some suggest to put more/less olive oil, more/less garlic but overall it's pretty "stable" list of ingredients here.


Taste Description
First what strikes your buds is fishy taste. But it's not "bad-fishy", it's "good-fishy", reminding me dried fish often eaten as snack in Eastern Europe, Scandinavia, China or Japan. Dried fish snacks are not known here, in US, and may sound weird for regular american (he-he :)) Anyway, if you happen to like this flavor - you will love this pate. Although fish taste is very subtle in this pate, softened and enriched by cream and olive oil and driven in another direction by powerful garlicky notes.
Texture is whole another story - it's very "meaty" although smooth. Toasting or broiling makes different kind of transformation - pate becomes stringy-crusty on a top and juicy and tasteful on a bottom (this is my favorite way to eat it so far).

How to Serve
It can be served in a million ways - spread on top of bread or polenta, toasted/broiled or "as is", inside of pie crust or on top of rice/potato/pasta (and then broiled), mixed in mashed potato for croquets and so on. From here, list can go on and on - let your
creativity go wild here :).


Salt Cod Pate (Brandade de Morue)

  • 1/2 file of salted cod (baccala, bacalao)
  • 1 cup of cream
  • 1 cup olive oil
  • 3-4 garlic cloves
- Wash off salt from a cod fillet and soak it for at least 24 hours in a pot with cold water. Keep it in a fridge and change water couple time during this 24 hour period.

- Place cod in a pot with fresh cold water and, on a high heat, bring it to a boil. Take off the heat immediately and set aside for 10-15 minutes.

- Fish out cod to a plate and flake it with a fork.

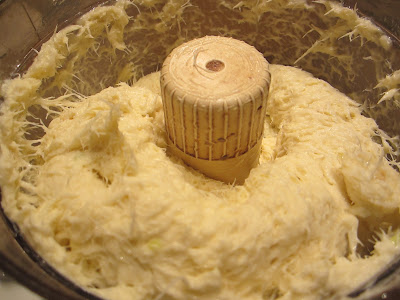
- Place flaked cod, garlic and 1/3 of olive oil in a food processor and process taking turns with adding remaining olive oil and cream. It should take a minute or two. Adjust pate by adding more cream or olive oil.

- Add some freshly ground black pepper and you've done - you have delicious pate you can use in various ways (see suggestions below)!

*********************************************************************************************************************************
IN PICTURES


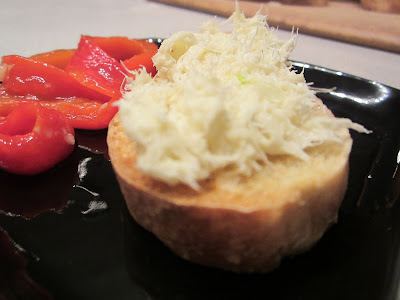
Toast giabatta bread slices, then rub 'em generously with garlic, spread your pate and serve with marinated pepper on a side. It will make great appetizer course (see picture below).


..or just place piece of marinated pepper right on top

Or sneak some buttery carrot puree underneath..

Or mix your sauteed cabbage melange leftovers with some cooked rice, drop brandade on a top and place in a toaster-oven for about 10-15 minutes to heat and brown up on a top. I had a perfect breakfast this way (below) :)


It was pretty tasty with my tomato sauce I was making for fried wontons couple days ago. It was my lunch -yum-m..

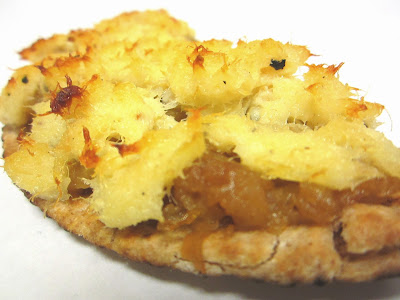
I also tried brandade (pate) with caramelized onions, leftovers from my wontons too :)

Toasting  Brandade de Morue gives you this awesome thready crunch on a top and makes pate juicier and more delicious.