Wednesday, March 23, 2016

Garden Salad with Black Beans and Feta

Besides the fact this salad is really delicious, it is also beautiful, can be made ahead and easy to make. 

Blog's Category: Healthy, My Staple Food, Vegetarian


Intro

Isn't it nice when you are served with a salad, in which all ingredients speak for themselves - no need to ask "excuse me, what's ingredient list for this one.."? Your guests won't be bugging you with questions, if you serve them with this pretty garden salad creation.

Use your creativity to place your chopped or sliced vegetables in artistic manner, or simply copy my version of salad. Of course, you can try almost any combination of vegetables and other traditional salad additions, such as cheeses, nuts, seeds of croutons. Although, here, I'm suggesting ingredient combination that was already tested and received highest ratings from my family and friends.

I've made my own recipe for the dressing - I wanted something simple and yummy. I think, I ended up with a "bingo" combination for a dressing, which I'm going to use over and over again.

What ingredients I insist on for this recipe?

- Nice (not low fat) feta. It's creamy, bold and tasty.
- Light (low sodium) soy sauce. It just tastes better! Almost always, I use this one.
- White vinegar. Not balsamic, not wine vinegar, not apple. Simple, old white vinegar.

What is it?

A few vegetables, black beans and feta cheese are layered artistically on a plate. Soy sauce and white vinegar based dressing.


Taste Description

Each ingredient brings its own note into this salad "orchestra". I really love feta in here, though I couldn't say I'm a big fan of feta. Beans makes this salad richer and more balanced. Gentle soy sauce umami flavor, mingled with white vinegar and a bit sugar, makes a difference as a perfect dressing for all that goodness.

Tips

- Use this dressing with any other salad - it's easy to make and delicious.
- I like to use small glass jar with twist-on lid to shake up dressing. It's easier, faster and less messy than to use bowl and whisk. Also, it can be made ahead, popped in a fridge and than, just grab it, one more shake before pouring it on a salad to serve and voi la!


How to Serve

Salad can be plated in advance and kept in a fridge under a plastic wrap for a several hours. Pour dressing over right before serving, or directly at a table. I is your choice to mix all ingredients up at a table, before serving onto your guest's individual plates, or leave it as is allowing people to serve themselves whatever they want from that plate.

Garden Salad with Black Beans and Feta


For a large plate to serve party of 8:
  • 3 roma (plum) tomatoes, very thinly sliced
  • 1/4 small cabbage, shredded 
  • 1 can black beans, drained and rinsed
  • 1.5 cup of crumbled feta
  • 1 medium english cucumber, very thinly sliced
Dressing:
  • 1 tbs soy sauce
  • 2 tbs white vinegar
  • 1 tsp sugar
  • 1/3 tsp salt
  • 4 tbs olive oil
Garnish:

  • 1/4 sweet onion, finely chopped
  • black pepper

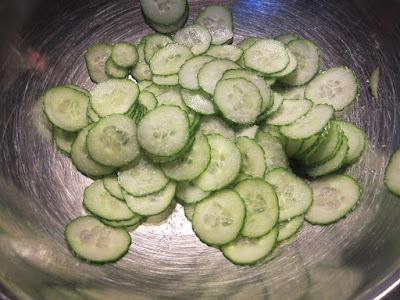
- Cucumber requires a little bit extra steps - after slicing it thinly (I use mandoline), add about 1 teaspoon of salt, stir and let it sit for about 10 minutes while you are preparing other vegetables. 

- Slice, chop, shred vegetables as described in ingredient list.

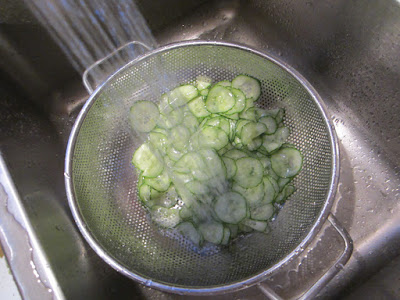
- Transfer cucumber slices in colander and rinse well. Before placing cucumbers on a top of salad, squeeze out extra water. You will get tender, wavy, still a bit crunchy fun looking cucumber slices. 

- Arrange vegetables on a plate - take a look at pictures below, and ...

- Done! Pour dressing and enjoy :)


*******************************************************************************************************************************


IN PICTURES


Friday, March 18, 2016

Chicken BBQ Lollipops

Success is guaranteed! Your kids will be begging for it! This chicken-on-a-stick is the most humble recipe for chicken drumsticks you ever come across. Don't take my word for it - try it!

Blog's Category: My Staple Food, Kid's Favorite


Intro

I make this simple oven roasted BBQ chicken for years. But it is just recently, making this easy BBQ chicken, I prefer using drumstick rather than thighs or leg quarters. Why? Because I can make these awesome lollipops out of them! They look funky and taste amazing, kids love them and, it looks like, adults love them even more.

The same kind of chicken lollipops can be made of drummets, a bottom section of whole chicken wing. In this case they will be smaller. It's a good idea to use drummets for chicken lollipops if you are planning to serve them as hors d'oeuvres. Actually, you will be surprised, how small will be your chicken lollipops made of drumstick too - they shrink a lot during cooking.

There is a couple of important steps you have to obey. Do not be tempted to make your own way. Stick to the recipe and you'll be rewarded with some delicious recipe you will be passing from generation to generation :)


What is it?

Chicken drumsticks, made in a lollipop shape, roasted in an oven, and then finished with a BBQ sauce of your choice.


Taste Description

Sticky caramelized BBQ, covering these little meaty lollipops... Juicy, naturally flavorful meat... Nice secure grip onto warm bone.. You've got the picture, right?


How to Serve

Serve right away. Keep leftovers in a fridge for up to 5 days. 

For serving, you can use fancy paper frills, if you wish, but I prefer the look and feel of bare, warm bone. These lollipop bones-handles will cool down pretty quickly and in a couple of minutes you will be able to hold it with a bare hands.

Chicken BBQ Lollipops


  • dozen of  chicken drumsticks 
  • about 1/2 bottle of you favorite Bar-B-Q sauce
  • 2 tbs of sriracha sauce, optional (do not use this hot sauce if you or kids don't like spicy food)

- Take drumstick. Using your biggest and sharpest heavy chef's knife, cut right through the bottom joint to make it flat - your drumstick should stand vertically and firmly on a baking sheet. Then, in a circular motion, cut around upper joint to separate skin and tendons from a joint. Push skin down, away from an upper joint. Cut through the middle of upper joint to remove surrounding cartilage and clean the bone (see pictures below). 

- Preheat oven to 380F. Tacking skin underneath, place chicken lollipops on a greased baking sheet or use silicon baking pads as I did.  Do not salt, pepper or season in any way your lollipops! (This is important!). Bake until drumsticks are cooked through, skin is tan, a bit bubbly and crisp. It will take about 30-40 minutes depending on a size of your chicken drumsticks.

- Pour BBQ sauce into a small bowl. Add sriracha (if using) and stir. 

- When cooked through, remove drumsticks from an oven. Please note that if you cook a lot of lollipops, most likely, you will have some juices in a bottom of pan or baking sheet. Then transfer lollipops onto a plate and discard (or reuse somewhere else) juice from a baking sheet (And this is important too!)

- In a twisting motion, dip each lollipop into BBQ sauce and place back on a baking sheet. Keeping the same temperature, finish chicken lollipops in an oven until BBQ sauce caramelizes into a sticky bubbly coating, not earlier. Remove from an oven and let it rest for about 5-10 minutes before serving.

- Done! Enjoy :)


*******************************************************************************************************************************


IN PICTURES

With a nice heavy knife, like mine, you won't have a problem cutting through a joint.

Skin and tendons, right under upper joint, are cut up, separated from a bone and pushed down.

One done, nine to go.. It's actually fun to do this. This time I delegated it to my big boy Danny (he's almost 20) - he liked to do this!


Adjust sriracha quantity, if you like it spicy and using it, according to your heat tolerance.


This time there was no any juices accumulated in a bottom of pan. Previously, I cooked lollipops for a large crowd and there were about 30 drumsticks, and a lot of juices. Do not forget to pour them out before roasting drumsticks with BBQ.

No basting, just dip-twist-shake method. Easy-peasy ...

That is important to let BBQ sauce to caramelize until it's dry and sticky.


Tuesday, March 15, 2016

Belgian Endive with Kani and Cheese

It is fail-proof appetizer,  delicious, yet simple and straightforward. These little boats of endive are filled with cheese and flavorful japanese-style crab imitation sticks called kani sticks.

Blog's Category: Healthy, Hors D'oeuvre, My Own Fast and Easy, Seafood, Vegetarian


Intro

Appetizers are my favorite course. At a restaurant, I often order two appetizers, instead of entree, or entree and appetizer, as normal people do. IMHO, finger friendly appetizer is, indeed, ideal food. Also I love to create my own finger food like this Kani fish stick and cheese stuffed endive.

Belgian endive is ideal vessel for finger food - its shape, crispy juiciness and neutral taste was created by nature to deliver delicacies right to your mouth :)  There can be endless combinations for filling. Here is recipe for one I made recently and was very pleased with.

Couple words about kani fish sticks. It is much like your regular fish sticks, also know as crab or lobster imitation made of various types of fish. Although kani fish sticks are more flavorful and can be easily pulled apart into thin long threads. This quality makes kani sticks ideal for Japanese kani salad  or, as in this recipe, creates awesome texture for filling.

This recipe is a great hors d'oeuvre, especially if you are going to serve a crowd. Placed on a shallow flat dish in a shape of lotus flower, it will make impressive plate for your feast.


What is it?

Each belgian endive leaf is filled, first, with garlic infused grated cheese, then - with a mix of chopped kani sticks, walnuts, teeny-tiny amount of mayo and puff of cayenne. Lettuce "boat" is garnished with walnut segment and some dry seaweed topping.


Taste Description

Crunchy on a bite, it will burst in your mouth with a tender "crabby" flavors of kani sticks, tangy notes from cheese, delicate heat from a pinch of cayenne and wonderful mix of textures - crispy lettuce, buttery cheese, airy kani stick pieces and small walnut bits in it. 


How to Serve

Serve right away or keep in a fridge for up to 24 hours. 

Belgian Endive with Kani and Cheese


  • 3 small Belgian endive lettuces 
  • 8 oz grated mozzarella
  • 1-2 garlic cloves, finely chopped or grated
  • 10 kani fish sticks, thawed (they usually sold frozen)
  • 1 tbs mayonnaise
  • 1/2 cup of walnut meat, chopped (save some segments for garnishing)
  •  pinch of cayenne
  •  1 tsp seaweed topping (store bought - furikake, or other type of seaweed topping)

- Cut off base of each endive lettuce and separate leaves. 

- Thoroughly mix mozzarella with garlic. Optionally, add a bit of mayo to make mix creamier. 

- In a food processor, pulse kani sticks a couple times into small strands. Add mayo, chopped walnuts and mix.

- Fill lettuce leaves, first with cheese, then with kani stick mix. Assemble them on a shallow plate in a shape of flower (see photos below). Garnish with walnut segment at the base of each leaf. Sprinkle seaweed topping on a tips of each leaf.

- Done! Enjoy with a flute of bubbly Brut:)


*******************************************************************************************************************************


IN PICTURES

Try to find endives about 5" long - it will have leaves ideally sized for this appetizer. Trader Joe's has it just right. Also having red endive brings more fun to a plate and to your imaginary lotus flower.

After cutting off a base and separating couple leaves, you will need keep cutting off further to separate more leaves. Do not throw away the heart of lettuce - dip it into something and eat "on a fly" - it's wonderfully crunchy and refreshing. Danny, my son, just love it ;)

It's your choice, how full your lettuce boats are going to be. I made smaller ones fuller than bigger ones :)


I used furikake as seaweed topping. Furikake is my favorite Japanese rice seasoning. You will find it in any Asian market, somewhere in a spice, salt, pepper section. It's usually several types of furikake, I like almost all of them and use often for plain rice. In the same section you can also find nori seaweed topping in a small packets, which also can be used for this recipe.


Looks like lotus, right? Somewhat :)