Friday, August 31, 2012

Rabbit Stroganoff

Blog's Category: USSR-era Recipes, International


Intro
Have you ever tried rabbit meat? If I would still eat meat in general, rabbit would be my choice of meat. It has very distinctive amazing flavor, delicate taste and great nutritious qualities.
In my Ukrainian childhood I was treated to rabbits pretty often - my grandparents were actually growing it.
There is a classic Ukrainian dish which translated sounds like "rabbit cooked in a sour cream", so let's call it Rabbit Stroganoff. Speaking of this dish, my mom was cooking it the best (naturally!), really - I never ate better rabbit than that of my mom's. Looks like I can call myself the master of this dish also (forget about modesty :)).  That's why I'd like to share this recipe with you. 
Variations
- You shouldn't really seek for variations. It's a small number of ingredients in this recipe and they are basically irreplaceable and cannot be omitted as well. Please try to make it exactly as I suggest below and you'll see what I mean.
- Also try to get fresh rabbit, not a frozen one. I cooked both, fresh and frozen, and always, always, fresh was much better.

Taste Description
There is nothing too bold or harsh about taste of this dish. Softness and richness, multi-layered subtle flavors are happily marry here. Meat is flavorful and has an interesting texture.Sauce is so delicious that you may forget about meat itself.

How to Serve
To utilize great sauce, serve this rabbit with a side of mashed potato (make a wail in it and fill with the sauce). Rice or any other grains works as a side dish here as well.

Rabbit Stroganoff


1 rabbit, cut in pieces
1.5 to 2 c sour cream
1 large onion
5 garlic cloves
2 bay leaves
3-4 c water
salt
black pepper
5 tbs olive oil

- Cook rabbit pieces in a pan with olive oil until just slightly browned. It's better "underdo" here than "overdo". Rabbit may be tough if fried too much.

- Transfer rabbit to the pot (dutch oven type is the best).

- In the same pan where rabbit was cooked, fry chopped onion until soft and just started to get some tan.

- Add minced garlic to the onion, stir for couple times and add sour cream, water, salt, pepper and bay leaves. Cook sauce for a couple more minutes until sour cream is melted.

- Pour sauce over the rabbit. Bring pot with a rabbit and a sauce to the boil and switch heat to the low. Simmer for about 30 minutes until sauce is smooth and silky and meat is cooked.

- Turn off the heat (don't forget to stop tasting the sauce before it's not too late and it's gone !)

- Enjoy!

*********************************************************************************************************************************
IN PICTURES
I know :(.. Poor rabbit


As I said - do not "over brown" the rabbit.


Use real stuff, no low fats or non-fat G** FORBID  :)


Bay leaf is the must!

I had hard time stopping tasting the sauce. Too bad, I had to stop - it was just perfect, no more excuses for trying it again and again...
Here it is - done.

Thursday, August 30, 2012

Easy Cream Cheese Quesadilla

Blog's Category: Perfect Breakfast, My Staple Food,  Hors D'oeuvre


Intro
Do you ever wake up and have no desire what-so-ever to cook anything more complicated than scrambled egg or so? Well, the recipe below really is not more complicated than that with an over-the-top satisfactory rate. With a cup of coffee you are good to go to whatever you have in plans for your weekend. Did I ever mentione that I cook breakfasts exclusively on weekends? On weekdays my breakfast consists mostly of some kind of small pastry and cup of coffee... then another one [coffee]... and may be one more if I really need to open both eyes.
Back to weekend breakfast - that's the time when you can start slowly on cooking and then slip back to half-awakened state enjoying fruits of your labor sitting on a summer deck, mellowed by food, coffee and birds chirping.
So here is the perfect-fit recipe, right for the scenario above.

Variations
- Endless. Cream cheese is a plain, no-fuzz, readily available ingredient that creates nice airy contrast to crunchy tortilla crust. Although any cheese would work, but I insist - try cream cheese, you'll be surprised.
- Any protein additions are welcome (as bologna below for my carnivores) but do not go over with it - the whole point of this quesadilla is crusty-crust and a thin smooth but flavorful filling.
- For a "flavorful" part of filling I like green onion here. I think a little bit of another finely chopped vegetable or even some spice would be a good substitute for this.

How to Serve
Cut in half and serve as a breakfast; cut in smaller wedges and serve as hors d'oeuvres at your next party!

Cream Cheese Quesadilla


Serves 2

2 tortillas (I used chili pepper tortillas from Trader Joe's)
4 tbs cream cheese
1/2 c chopped green onion
2 slices bologna (optional)
oil for frying (optional)

- Spread cream cheese on a half of each tortillas and sprinkle with green onions. Place chopped bologna on a top (if using any). On the pictures below you'll see the swirls of bologna - that's just because I didn't bother myself with a cutting board and cut bologna right in my hands, rolling bologna pieces up beforehand :)

-  Flip another half of tortilla over and throw both tortillas on a preheated pan slightly covered with olive oil. Fry on a medium low heat, under tortilla press (use a plate otherwise), until it's golden crusted. Flip it over and fry until other side is done.

- Enjoy right away or let it cool down for a couple of minutes. Or, eat it cold - still good
*********************************************************************************************************************************
IN PICTURES


Who knew that I'm going to use this tortilla press this often. Actually it comes useful far beyond "tortilla world".


Tuesday, August 14, 2012

Green Cornbread


Intro
August's "The Daring Kitchen" challenge is a cornmeal. Right away, cornmeal almond cake come to my mind that I read about just yesterday in "El Farol: Tapas and Spanish Cuisine".
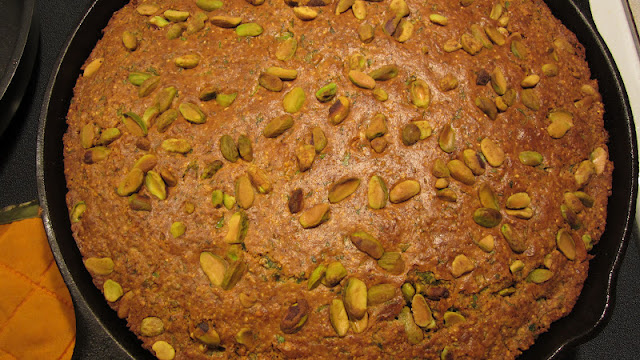
Although after initial excitement, cooling down, I decided to cook plain cornbread. Well, "plain" is too boring for me. So to jazz up "plain bread" I added some ingredients that, I think, are natural fit for the cornbread - a lot of fresh herbs, some extra eggs and, of course, nuts. To make bread truly "green" I used pistachio nuts (luckily they were sitting in a cardboard miraculously not eaten by my sonny, just yet :)
It was not my first ever cornbread, I made cornbread before - rarely I have that strange urge to make one. Once satisfied, that urge do not come back for a while.. then.. boom.. again - I have to make cornbread right now! Usually, I do not keep previous recipe and have to search for one again. I think, this time this recipe deserves to be written down - bread come out very nice - moist, very flavorful, a bit grainy (is that its graininess that we crave sometimes?), with special cornbread aroma hitting you in waves.

Notes along the way
- I definitely have to try that Almond Cornmeal Cake I mentioned above. With a distinctive flavor of cornmeal it may be very interesting ending results :)
- I'm glad that its green color bread gets from herbs, green onion and pistachios and not from a pinch of artificial color.
- I probably can call this recipe my own, as there is nothing but cornbread, sour cream and salt are left from original recipe I adapted it from.

Green Cornbread


To serve 8 generous slices:

1 c unbleached wheat flour
1 c yellow cornmeal
1 tsp baking soda
1.5 tsp baking powder
2 tsp red pepper flakes
1/2 tsp salt
1 small bunch fresh cilantro, finely chopped
1 small bunch fresh parsley, finely chopped
5-6 green onions
eggs
3 tbs brown sugar
1 c sour cream
4 tbs ghee  or butter
1/2 c pistachio nuts, shelled

- Mix first 6 dry ingredients.

- In a separate bowl, beat together eggs, brown sugar and sour cream until smooth and well mixed (about 2 minutes with my handheld mixer).

- On a stovetop, on low heat, melt ghee (or butter) (I used cast iron skillet for this).

- Add egg mix, herbs and onions to the dry mix, stir everything together. Add to the batter half of melted butter from the skillet.

- Preheat your oven to 375F.

- Transfer your bread mix into preheated skillet with a melted ghee (butter). Sprinkle with pistachios. Let it cook on a stove top on medium-high heat for 1 minute and then move skillet into preheated oven. Bake for about 40-60 minutes until golden-brown.

- Remove from the oven and let it rest for about 20-30 minutes.

- Now cut a slice and enjoy! It's nice all alone, or with chili or vegetable stew.


Blog-checking lines: Rachael of pizzarossa was our August 2012 Daring Cook hostess and she challenged us to broaden our knowledge of cornmeal! Rachael provided us with some amazing recipes and encouraged us to hunt down other cornmeal recipes that we’d never tried before – opening our eyes to literally 100s of cuisines and 1000s of new-to-us recipes!

Thursday, August 2, 2012

Zucchini Ikra

Blog's Category: My Staple Food, USSR-era Recipes
Intro
In Ukraine, it's actually called "Kabachkovaya Ikra". I'm presenting it here as Zucchini Ikra, although, equally it can be called Zucchini Ragu, Zucchini Ratatouille, and so on, you've got the idea, right?
With minor modifications, often depending on the content of my fridge, I cook this vegetable ragu often. It is always flavorful and satisfies that occational craving for cooked vegetables meal. The main trick here is adding sweet and sour elements which will play the major role here in creating the taste. Sweet elements would be carrot, sugar, etc. Sour elements can be tomatoes, sometimes vinegar or lemons, tamarind (if you are into Indian cuisine right now).
This time I cooked this dish just because I had zucchini and I was in a need to cook something that would go nicely with cornmeal bread I just have baked.

Variations
- If you do not have fresh tomatoes, take the canned one. If you are out of that one too, just add few, two or three, tablespoons of vinegar or lemon juice and you will get that sour component of the dish.
- Though fresh parsley is the best in here, add dry one instead if you don't want to make a trip to a store just to get fresh parsley. Oh, yeaa, use any other herb you love :)
- Sometimes, instead or in addition to zucchini, I use eggplant or summer squash.
- Interestingly, but changing the way you slice your vegetables (size, shape), you can totally change the dish. Many years ago I remember making Zucchini Ikra with zucchini, onion and carrot not sliced but ground on a meat grinder machine. For some reason I'm not up for making it these days. But it was good, really good Ikra, smooth in a texture and tasty.

Taste Description
Vegetables are cooked completely in this dish, so they are smooth and buttery in a texture. Soft sweet-and-sour notes on a vegetable aroma background create delicious harmony for your taste buds. 

How to Serve
There is various ways to serve it. First of all - it can be served hot, warm or cold, out from a fridge - it will be delicious any way.
Casually, I spoon it on a top (or side to side) of my starchy sides such as potato mash, Buckwheat Kasha, or cooked pasta. As a quick snack, I spoon it on a piece of country bread - it is my favorite way to eat it!

Zucchini Ikra

3 zucchini, sliced in 1/8" quarter-circles
3 carrots, sliced in 1/8" half-circles
1 large onion, chopped
3 ripe tomatoes (or 1 can of tomatoes), processed/blended
2 tbs sugar
1 bunch of fresh parsley, chopped
generous amount of freshly ground black pepper or 2 tsp sabji masala (Indian spice mix for vegetables)
salt
5 tbs olive oil

- In a frying pan with olive oil, cook onions until soft.

- Add carrots and cook stirring for about 5-10 minutes.

- Add zucchini and continue to cook stirring for about 10-20 minutes or until carrots and zucchini are soft.

- In a blender or processor (I use my handheld immersion blender), finely chop tomatoes and add it to the pan. Stir and continue to cook.

- Add salt, pepper and sugar. Stir. Cook until tomato juices evaporate. Adjust seasoning. At the very end, add parsley, stir once or twice and take off the heat.

- Enjoy!

*********************************************************************************************************************************
IN PICTURES


These are not tomatoes I used in the recipe... These are from our garden, we eat them as is and right away. That's when word "fruit" is totally fit to tomato. These tomatoes still keep sun warmth, incredible aroma of its greenery, and juices that seem to be still moving through the flesh. My favorite are yellow cherry tomato on a background, they burst in your mouth as a little sweet granades of joy.