Wednesday, November 18, 2015

Chocolate Chia Pudding

Do you love chocolate pudding? Wish it would be more healthy? Wish you could make fast and easy way? Yes! You've got it. Here is just this kind of chocolate pudding - healthy, dark-chocolaty, easy to make!

Blog's Category: Dessert, Perfect Breakfast, Snacks, Vegetarian


Intro

If you are going through rough period of craving chocolate, especially if you are dark chocolate lover, I think I have found remedy for you. At least it works for me. This chia pudding with a good amount of real coco-powder, garnished with a grated dark chocolate and sweetened with a natural maple syrup, is wonderfully healthy and satisfying.


Probably the best of all is how easy to make it! Just whip all ingredients together at night, pop in a fridge to swell and, in a morning, you've got yourself real treat. If you are not heavy eater in a morning, this pudding can easily be your breakfast.


What is it?

It is a mix of milk (any kind - real, almond or soy), cocoa powder, chia seeds and maple syrup. 


Taste Description

Taste is very-very chocolaty. It will be even more chocolaty if you sprinkle grated dark chocolate on a top. Although the most striking in this pudding is its tecture - thanks to a chia seeds. They will pop under your teeth - plump, buttery and chocolaty. You will love it, I promise :)


How to Serve

Serve, cold, from a fridge, topped with a chocolate. It will keep in a fridge for at least 3-4 days. 


Notes

- If you feel like bright chocolate flavor is not enough, add some cinnamon, or vanilla.

- If, opposite, you feel like impossible happens and it's still is not chocolaty for you, even with addition of grated dark chocolate on top, there is one secret weapon for this too. Drizzle chocolate syrup or chocolate ganache on top, store bought or homemade!

- If you are adventurous, add some ground black peppercorn on a top!


Chocolate Chia Pudding


For a single serving:
  • 1 cup almond milk (or regular milk)
  • 5 tbs maple syrup
  • 3 tbs chia seeds
  • 3 tbs real pure cocoa powder
  • pinch of salt

- Using whisk, mix all ingredients in a large bowl for about 3 minutes.

- Pour mix into mason jar, close with a lid and transfer into a fridge for at least 3 hours or overnight.

- Remove from a fridge, stir, sprinkle grated dark chocolate on top and enjoy!


*******************************************************************************************************************************


IN PICTURES


Saturday, November 14, 2015

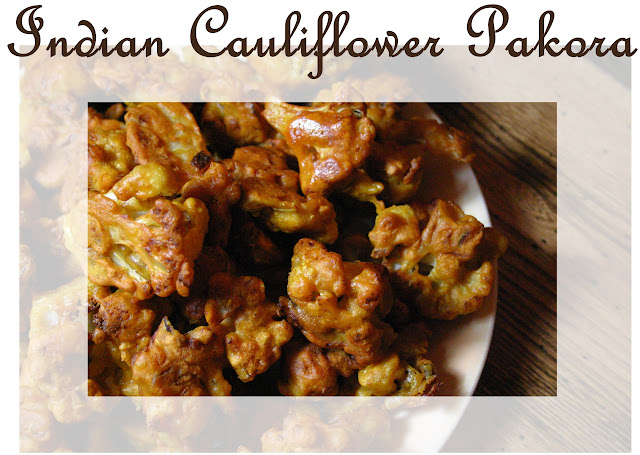
Indian Cauliflower Pakora

Indian pakora is essentially a vegetable fritter. But without using flour, at all! Come here and see how these yummy fritters can also be pretty healthy!

Blog's Category: DK Challenges, Hors D'oeuvre, Indian, International, Snacks, Vegetarian


Intro

Indian pakora is Indian version of fritters, chunks of different variations of doughy vegetables, cooked in oil. But there is a wonderful detail behind pakora recipe - there is no dough! Actually, there is a batter made of chickpea (or garbanzo bean) flour called gram flour. As you know, chickpea is a legume and a great source of vegetable protein and generally, is a very nutrient-rich food. With onion, garlic and spices, added directly to a gram batter, and a piece of vegetable inside of fritter, you have yourself pretty nutritious food here. Forget that it is fried in an oil! With a rule number one - everything in moderation - these fritters are healthy option after all.


You can buy gram (chickpea) flour at any asian grocery store. Some whole food stores most likely have it also. All the rest is a matter of your creativity - you can add to a batter whatever seasoning or finely chopped vegetables you like. As a "core" of pakora, you can use practically anything - piece of vegetable, piece of meat or shrimp. But, before flying free, I suggest to make this traditional Indian pakora first :)


What is it?

Slice of raw cauliflower, dipped in chickpea flour based batter and fried in olive oil. Chopped onion, garlic and some Indian spices are added to a gram flour batter. Classic preparation calls for deep frying. I use about 1/2 inch of oil in my frying pan. As I know many Indian homecooks do just that.


Taste Description

Delicious! Cooked fritter is not just crispy on outside, it's crispy-hard, you can almost knock at it!. Inside it is soft, very flavorful, a little chewy. All that spices, onion and garlic make a wonderful combination of flavors. It has just faint hint of spiciness from a regular chili powder. If you like spicy food, you will definitely want to add some cayenne or fresh chopped chili to it. Or you can enjoy pakora with a spicy sauce! In a recipe below, I'm offering to you simple mayo-based sauce, which is spicy and a bit smoky.


How to Serve

Serve right off the stove, with a spicy mayo-base sauce (recipe below). Also, pakora is sensational with a dollop of plain sour cream on a side, or any yogurt based sauce. Dairy sauce for pacora is really good if you decide to make your pakora spicy, adding some cayenne to a batter ;)

Pakora, cooled down, is yummy also. It will keep in a fridge nicely as well - it won't be crispy next day but still will be pretty tasty. In this case I would recommend to eat it as is, cold, or place it in a toaster-oven for a five minutes - it will regain its crispiness. 


Notes

- As I mentioned above, there is so many variations for pakora - different herbs, spices, vegetables, meats and seafood additions! Be creative, but only after trying this traditional version - learning first, creativity comes after :)

- Sometimes ghee (clarified butter) is used for frying pakoras. Next time I'll try to use it and will post results. I think, it should be pretty cool.


Indian Cauliflower Pakora


For a family size platter with a pile of pakoras:
  • 1 medium cauliflower, cut in medium florets, which then cut in half
  • 2 cups of gram (chickpeas) flour
  • 1 large onion, chopped
  • 4 garlic cloves, minced
  • 2 tsp salt
  • 1 tsp ground or crushed coriander
  • 1 tsp chili powder (mild, the kind you would use for your chili)
  • 1 tsp turmeric
  • 1 tsp garam masala (or cumin powder)
  • 1.5 cup tap water
  • flavorless frying oil (I used light olive oil)
Sauce:
  • 4 tbs mayonnaise
  • 1 tbs sriracha (hot chili sauce)
  • 1 tbs ketsup manis (or any smoky sauce such as BBQ)

- In an extra-large bowl, using your hands, mix, rubbing, all ingredients together, except cauliflower, water and oil.

- Mix in water to create thick but still slow-runny batter.

- Add all cauliflower pieces into the batter and mix, turning over, to coat all pieces in batter.

- Fry in a pre-heated frying pan, 1/2 inch filled with oil, on a medium, medium-low heat, spooning pieces of battered cauliflower on a hot pan, and then flipping them over. Combine small pieces together if you wish, or fry them separately.

- Enjoy!


*******************************************************************************************************************************


IN PICTURES


Chickpea flour has such a beautiful creamy hue...

Don't skimp on onion, trust me, you'll be wanting more onion in your bite :) I used red onion, but any kind of onion is acceptable.

It's plain tap water. It's cloudy just because I'm lazy to wash measuring cup after I use it for gram flour... should I? 

It's therapeutic to feel this batter under your fingers, right? 

Do not hesitate, just throw all together and mix.


Frying is my least favorite process..What I liked about frying these pakoras - there was almost no splattering of oil around. Probably because cauliflower is not particularly juicy vegetable and other, such as onion, is enclosed in a batter!

For convenience, I suggested (above) to cut florets in half just to have fairly flat pieces. Anyway, some pyramid-shaped pieces needed third side frying...


Crispy-hard..knock, knock.. who's there? pakora :)


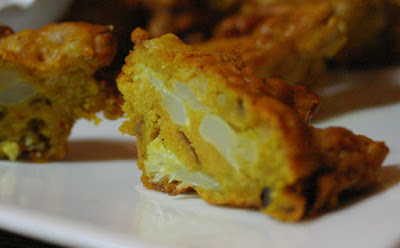
Pakora piece, cut in half. Remember - no flour! It's all chickpeas!

Blog-checking lines: Vimala was our host for the November daring cooks challenge and she invited us to try our hands at some Indian snacks and treats

Tuesday, November 10, 2015

Quick Fermented Tomato Halves

Already fan of fermented tomatoes? Never heard of such? In any case, try this ancient recipe of quick fermented tomatoes. Those are my favorite. Can be yours..

Blog's Category: International, My Staple Food, Snacks, USSR-era Recipes, Vegetarian


Intro

Why people shy away from fermented food? In general.. I'm not talking about those who are already "in", who once tried fermented food, such as sauerkraut, fermented tomatoes, fermented cucumbers and so on, become dedicated fan of it.


If you think about it, we already have a lot of fermented food around - yeast bread, yogurt, cheese, buttermilk. Each ethnic culture has some sort of fermented food in its cuisine. Fermented food is so beneficial for your health, and fear of getting sick of fermented food is so overrated, that, I think, we all should eat more fermented food and stores have to have more commercially produced fermented food, safe, healthy, delicious. 

Meanwhile, let's make our own fermented food! This time it is Quick Fermented Tomatoes. Just because tomatoes are cut in half before fermentation, time of fermentation is shrunk to a day or two instead of 4-5! Can't wait already?


What is it?

It is tomatoes, cut in half, and submerged into brine, along with plenty of fresh dill and garlic.


Taste Description

Briny, a bit fizzy, these tomato pieces are filled with sweet-&-sour juice. Did I mention that you can drink a brine too? Oh, you not just can, you will crave it :)


How to Serve

It's best when cold, from a fridge. While slowly continuing to ferment, even in a fridge, tomatoes will be good to eat for about month or two. Just do not forget that they should be kept in a fridge. After month or two, they over-ferment to the point of becoming way too sour. Although it practically never happened to us, as tomatoes disappeared way before this term.


Notes

- I already have a recipe of fermented tomatoes on my blog here. This recipe is very similar, it is for such impatient people as myself who wants what they want now :)

- While this recipe can be applied to any kind of tomatoes, the best sort for it is plum tomatoes.


Quick Fermented Tomato Halves


For a gallon-jar of fermented tomatoes:
  • about 6 lb of plum tomatoes, cut in half
  • 2 liters of water
  • 6 tbs sugar
  • 4 tbs kosher salt (or sea salt)
  • bunch of fresh dill, roughly chopped
  • 5 garlic cloves, finely grated 
  • 7 black peppercorns

- Make brine by bringing water to a boil and adding salt, sugar and peppercorn to it. Set aside to cool down.

- Meanwhile, in a clean, gallon-size jar, place tomato halves, quickly smudging them with a tiny amount of grated garlic, picked by the end of the knife. Sprinkle some chopped dill on an each layer of tomatoes. Fill jar with tomato half layers, cut side up, each seasoned with garlic and dill.

- When brine has cooled down, but still warm, pour it into a jar, over your tomatoes. Cover with a lid ajar, and let it sit on a counter at room temperature for a day or two. At this point they are ready to eat. Transfer to a fridge. Keep it there all the time, fishing out your fermented tomatoes as needed. Enjoy!


*******************************************************************************************************************************

IN PICTURES

Brine will become cloudy in about one day. That's how it should be. You will also notice some small bubbles on a surface. Sometimes, further in a fermentation process, thin white film may appear on a surface, it's also normal. It means that your tomatoes become more fermented and definitely has to be kept at low temperatures in a fridge. In my grandma's village in Ukraine, people were fermenting their food a lot. It's a brilliant way to preserve, for a harsh winter, all that bounty that earth can give us at a summer time. I remember my grandma had several barrels of fermented tomatoes, cucumbers, cabbage in her cellar. In a middle of winter, during my rare visits to her, I liked to step into this spooky, but strangely attractive, cellar to grab some tomatoes or cucumber from a barrel with a freezing brine. I think I still remember that musty, mushroomy smell under-the-earth there, in a cellar.. So.. yes, I do remember white film on a brine surface. Closer to spring time, this film was thicker, tomatoes are more sour and fizzy. But we still, rinsing away any remaining speckles of that white residue, enjoyed our "kvasheni pomidori" (fermented tomatoes) or  "soloni ogirki" (fermented cucumbers).

When I make fermented tomatoes or cucumber, I never do a single jar. It is usually, three or foru of them (that's why we absolutely need our second fridge in a garage) :)

Aren't they beautiful Frankly, no any color-enhancing technique applied here. It is its natural wet and briny tomato beauty :)

Tuesday, November 3, 2015

Corn Tortilla and Eggs

What can be better for a breakfast than fried eggs? This is Mexican style eggs, with tortilla, onion and peppers. One of my favorite breakfasts ever.

Blog's Category: International, My Own Fast and Easy, My Staple Food, Perfect Breakfast, Vegetarian


Intro

I discovered a beauty of corn tortillas recently. Insignificantly plain looking, corn tortillas would never caught your eye at a grocery stores. But, as soon as you start toast your corn tortillas on a skillet, its wonderful flavor fills your kitchen with a warm, fruity aroma. This flavor is a perfect match to fried eggs. To make a perfect breakfast, just add some vegetables! 


I have tried different combinations of corn tortilla with eggs and vegetables. All of them were pretty good. Although this particular combination is a winner.


What is it?

It's an eggs, cooked on a bed of toasted corn tortilla strips, cooked onion and two types of peppers - sweet and spicy. It served with plain chopped tomatoes.


Taste Description

Natural smooth richness of runny egg yolks, tender egg whites are swimming in a crunchy and chewy aromatic goodness of tortillas. In addition, wonderful pepper flavor, sweetness of onion, spicy heat of chili pepper and fresh juiciness of tomatoes create perfectly balanced breakfast bite.


How to Serve

Serve, as here, with a fresh chopped tomatoes. Other toppings would work as well:
- avocado
- fresh herbs (cilantro, parsley, thyme, sage, basil)
- any type of salsa
- some sour cream
- green onion
- any type of protein - chopped chicken leftovers, chick peas, beans, lentils.


Notes

- I would not recommend using store-bought corn tortilla chips in place of real corn tortilla. You won't get that wonderful, one of a kind aroma that makes this dish. However. If you in a hurry - go for it, I bet, it still will be enjoyable.

- As cooked vegetables, along with onion and peppers or instead of them, you can use carrots, cauliflower, broccoli, butternut squash, spinach (list can go on and on).


Corn Tortilla and Eggs


For a single serving:
  • 3 corn tortillas, cut in wide strips
  • 1/2 onion, chopped
  • 1/2 bell pepper, diced
  • 1/2 fresh chili pepper (or pinch of chili pepper flakes, or cayenne pepper), cut in thin strips
  • 2 eggs
  • 1/4 tomato, chopped
  • salt and black pepper to taste
  • 2-3 tbs olive oil, divided
- Use 1 tbs of olive oil to toast tortilla strips. Transfer toasted tortilla on a plate and set aside.

- To the same skillet, add remaining olive oil and cook onion and peppers until they start to caramelize. Add some salt.

- Turn heat to lowest setting. Add toasted tortillas to the vegetables, stir it together and crack eggs. Salt eggs a little bit. Cover pan with a lid and let it cook for about 5-10 minutes depending how well you would like your egg yolks to be cooked.

- Before serving, sprinkle with some black pepper and chopped tomatoes.

- Enjoy!


*******************************************************************************************************************************


IN PICTURES


To get really crispy tortilla, toast it, stirring, on a very low heat. It will help to dry it out completely. It will take some time, about 10-15 minutes.