Saturday, June 30, 2012

Buckwheat Kasha


Blog's Category: USSR-era Recipes, My Staple Food


Intro
Everybody who was introduced to GOOD (I mean it - good) buckwheat kasha from childhood, hooked on it forever. Yes, I swear every single Russian or Ukrainian loves it, kids adore it. Although you have to have nice roasted buckwheat groats to start with. Here, in US, it's available exclusively in Russian stores, only. Buckwheat offered from other sources is usually raw organic buckwheat that is just not going to work. Just using buckwheat "made in Russia/Ukraine" you will get that great Buckwheat Kasha where each groat stays whole and separated from each other. Proper buckwheat kasha is not a grayish muddy mush as you could think after having the first experience with a local buckwheat. Nice kasha rather reminds bulgur in a texture but lighter and softer than bulgur and has great unique flavor which is hard to describe.

Too bad that such a great product is just not available, not promoted and not wildly cultivated here, in US. It has great nutrition qualities to it: gluten-free, with a high number of amino-acids in it, low calorie and just plain tasty if proper groats are used.

Also, I found out that it cannot be wildly produced just because commercial fields are commonly treated with nitrates and buckwheat negatively responds to nitrites (opposed to corn and wheat that "love" nitrate)...[sigh]  Honestly it would be the most missed food for me... But things are a little bit different - we are happy and eat our buckwheat kasha :)
So, if you have Russian grocery around - go ahead and get that buckwheat and try out this kasha - you'll be surprised how good it is.

Variations
- We like to eat simple buckwheat kasha as a side dish, cooked with a plain water (not a broth). But some people like breakfast version of it cooked with milk and sweetened.

Taste Description
"Right" buckwheat kasha is loose, each grain (well, technically it's a seed!) is separated, texture is light and airy, taste is unspeakable, very flavorful.

How to Serve
Serve it as you would serve rice.  First add butter or olive oil into your buckwheat and then top it with any kind of cooked meat, fish, mushrooms or vegetables - it would be great if they would have some kind of sauce, buckwheat loves sauces.
Although to find out true taste of buckwheat - just add decent amount of butter and taste it. You may not want anything else on it - it's that good!
Buckwheat Kasha

Serves 4 as a side dish

2 c buckwheat groats
4 c of tap water
1/3 to 1/2 tsp salt  
unsalted butter to serve with 

- Wash your buckwheat groats to remove some dust and couple random hull specks.

- Put pot with buckwheat, tap water and salt on a heat. Ratio buckwheat to water has to be 1:2. As a buckwheat kasha pro-cook I do not make any measurement - I cook it in a bigger quantities and have water level 1.5" above the buckwheat groats. For the first time, you may want to stick to the ratio above.

- Bring water to a boil. Let it boil on a medium-high heat until water level comes down to buckwheat (or vice versa, buckwheat comes up to water level :)) It will take about 15 minutes. Then turn heat on the lowest setting, cover with lid and cook for 15-20 minutes. Turn heat off, let it stay for 10 more minutes (if you are patient enough!) and serve.

- Spoon some kasha to a bowl. Add butter. I have to mention that there is Russian folks proverb "butter will never spoil the kasha" - do you see what I mean? :)  And enjoy! Let me know if like it. I'll be happy if it happens, really! When I experience something great I want other people to know how great it is :)

Tips
- If you despite my precautions to use buckwheat from Russian store, only, (no commercial interest here, really :)  ..so, if you will use some kind of organic raw buckwheat, you may need to add more water during the cooking. Also be careful in this case about your kasha burning in a bottom. Trust me - I've being there. Well, I'm almost encourage you to try first Russian store's buckwheat (first please!) and then raw, organic, such as Bob's Mill brand - you will see the difference, it's huge.
*********************************************************************************************************************************
IN PICTURES

Buckwheat pack from Russian store (sorry, buckwheat itself is not in there - it's already in a pot..)


Buckwheat in a Russian store comes roasted so it has nice brownish tint to it. BTW I never had the same result trying to roast raw buckwheat at home...

It's ready to go on a stove.


Water and buckwheats are leveled up now and I am about to get lid on it and turn heat to very low.


It's ready!


Today we ate it with cauliflower and chick peas stew - heavenly tasty. Tomorrow my men will get kasha from a  fridge and pop it in a microwave with some chicken kotlets I've made yesterday - quick and easy meal. This kasha will serve us as a side dish for a couple more days - no complains.. ever!

Friday, June 29, 2012

Chicken Breast Kotleti

Blog's Category: USSR-era Recipes, My Staple Food


Intro
Chicken breast kotleti was strictly for kids... or for ill and weak. That happened just because chicken in USSR was sold almost always as a whole bird, we never saw pack of only chicken breasts, or only chicken drumsticks. So, limited quantity of kotlets made of breasts of a single chicken, was exclusive treat to us. Things change. Now not just my kids but also less privileged family members (he-he) can enjoy these delicious and delicate chicken breast patties. This is something that my almost grown up son still receives occasionally from his grandma as "baby-treat".

Variations
- It's your choice - to make your own ground chicken breast or to buy one. Just make sure it is indeed made of 100% chicken breast.
- Oatmeal can be replaced with plain bread crumbs. Actually, traditionally, cored white bread pieces soaked in a milk should  be in a place of oatmeal. But I like to use regular oatmeal (quick cooking is all right) just because it's more healthy option. By the way if you need to sneak oatmeal into your loved one diet - that's the way to do it. I bet he/she would never guess it's there - just try.

Taste Description
It's a very delicate nevertheless very flavorful, soft and juicy alternative to meatballs or even, forgive me, burger!  It's delightfully meaty with a silky chewiness to it - best of the all ground meat patties.

How to Serve
Serve it with pasta, vegetable or potato sides.
It can go inside you bun with or without all that additions such as onion/tomato/lettuce combos.
Make it small - and it will be hit at your cocktail party.

Chicken Breast Kotleti

Makes about 14: 

3 lb chicken breast (or chicken tenders)
1 medium onion, finely grated (or processed in a blender with 2 tbs of water)
1 egg 
1 c dry oatmeal
1/2 tsp black pepper
1/2 tsp salt
2/3 c water
light olive oil for frying
- Use meat grinder to ground your chicken breast.
- To the ground chicken breast, add grated (blended) onion, egg, oatmeal, water, salt and pepper and mix it very well with your hands until smooth and uniform.
- Preheat your pan with olive oil. With your hands, make patties in a shape you like or in a traditional boat shape (see pictures below). Fry them on a medium-medium (yes..not medium-high and not medium-low but somewhere in between). When bottom of your kotleti is nice golden-brown, flip it over, turn your heat just a tiny bit lower and cook until another side is golden-brown too.
- Transfer them to the plate and watch out for passing by dudes trying to steal kotleti before dinner starts. Enjoy!
Tips
- To make kotleti even and uniform, use cookie dough scoop.
- I do not prepare/shape my patties in advance and then fry them - I place my pan on a heat and as soon as oil starts to sizzle, I load the pan with kotleti one by one as I shape them. That means I  flip them over and remove them from a pan also one by one. It works for me just fine.
- Use two pans/skillets to speed up your process - after you have loaded your first pan with a first batch, get your second pan on a heat and start to load this one.
*********************************************************************************************************************************
IN PICTURES

All ingredients are in.. I just need to add a little water to bring juiciness up a notch and mix it very well.

These kotleti are for "insiders" so I didn't try to make them really even and pretty. Use cookie dough scoop to make them even in size.

Anyway.. aren't they beautiful?
I knew that... one is missing.. Who did it?

I can't believe I don't eat this anymore (hello to all vegetarians!).. it's so-o-o seductive.
Well, I use my son's and husband taste buds for testing it! Fast disappearance from a fridge tells it all also..

Thursday, June 28, 2012

Radish Salad

Blog's Category: USSR-era Recipes, My Staple Food


Intro
It was a big surprise for me when I find out that here, in US, radish is used mostly cooked. The way radish traditionally used in Eastern Europe is fresh, in salads. The recipe below is the simple radish salad, with a lot of green onions. For us it was symbolizing spring that has come. This salad was always served at May 1st celebration gatherings (known as International  Worker's Day or May Day for all of us who survived USSR :)).

Variations
- Fresh dill is often added to this salad. I guess it's really hard to tell which version is better: with dill or without.
- Sometimes this salad is dressed with olive oil and splash of vinegar but it is not my "cup of tea" at all. Sour cream is the must in my opinion.
- Also instead of slicing radishes you can grate them. It makes great salad too!

Taste Description
It's a crunchy and juicy goodness, a little bit spicy (actually depends on radish spiciness) and tangy, with a soft flavor of green onion and creaminess of sour cream. This salad has to be generously salted as saltiness has to be part of the game here.

How to Serve
Serve right away, as side salad to your main course. As with many fresh salads, this salad can not be prepared in advance - radish gives away a lot of juices and will become soggy if let it stay longer.


Radish Salad

Serves 8 as a side salad 

20-30 radishes, sliced
4-6 green onions (more-better)
4 tbs sour cream
salt
- Mix radishes with onion, sour cream and salt and enjoy! Yes, this simple!

Tips
- To slice your radish I use my mandoline slicer - just be careful with this tool. Also you can use knife. The fastest way to prepare radishes though is to grate them with electric grater!

*********************************************************************************************************************************
IN PICTURES

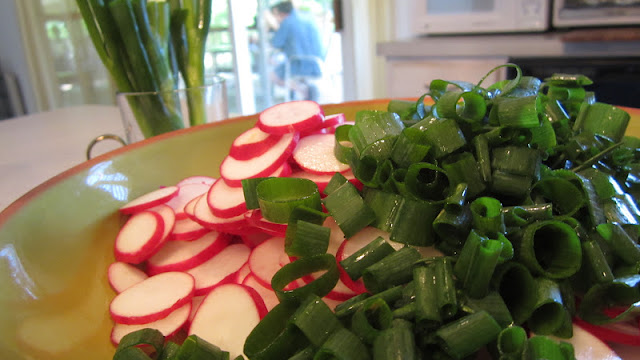
As always with vegetables, cleaning, peeling and chopping takes the most of the time.

I use mandoline slicer to slice radish. After two serious cuts to my fingers I'm a mandoline pro now :)


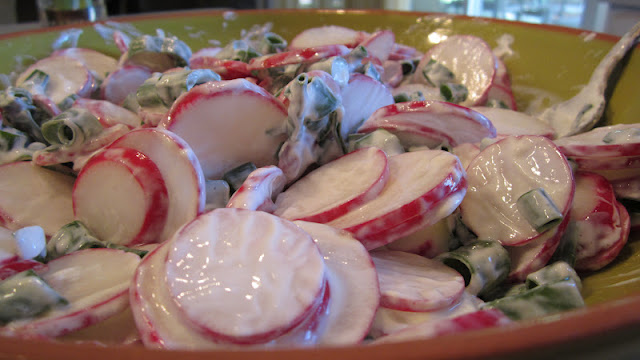
Picture-perfect serving

As I mentioned above, salad becomes soggy and kind of watery after a while, less crunchy but still awesomely delicious.

Wednesday, June 27, 2012

Broccoli Omelet

Blog's Category: Perfect Breakfast, My Staple Food


Intro
Last Saturday we visited local farmer's market. When we were strolling by picture-perfect broccoli, my son, looking down at me, started mumbling "when I was a little kid you used to cook for me that yummy broccoli omelet...". That was enough for me to get that broccoli and next morning we had that perfect breakfast that I value so much. Do you know, when something simple and good got forgotten and then make nostalgic come-back? That was it.
If you want to convert somebody to eat broccoli, this recipe may be a great starting point for this - broccoli here is a little crispy wherever it hits a skillet and slightly, just slightly tender on other sides.

Variations
- Substitute broccoli with any vegetable, adjust cooking time accordingly and you'll get great breakfast (too bad it won't be Broccoli Omelet anymore:))
- As always, fresh herbs are welcome. You can throw them into egg mix. Or use it for garnishing.
- Cheese. Of course, cheese makes a lot of dishes better. It's your call to use it here or not, and what kind of it.


Broccoli Omelet

Serves 4

1 large (or 2 small) heads of broccoli
6-8 eggs
1/2 c coarsely grated parmesan (totally optional)
salt
olive oil (or ghee) for frying

- Separate broccoli into medium-to-small florets. Pour generous amount of oil on a skillet and cook broccoli florets on a medium heat until they brown up to your liking. Do not fry them too much - they will brown up more later, with egg mix. Salt them a little bit.

-  In a separate bowl, slightly whisk eggs. Add some salt.

- When broccoli get a little crispy, distribute them evenly in a skillet and pour eggs on top, evenly as well. Sprinkle parmesan cheese on top (it's optional!). Immediately turn heat to low, cover and let omlet to cook for about 2-8 minutes.

-When eggs almost settled, divide omelet into 4 wedges and flip over each wedge separately. This step is optional - you can leave one side of your omelet cheesy and tender, then just bottom part will be fried-crispy. But we like to fry it on both sides - in this case parmesan creates its own tasty crust.

Tips
- Use non-stick pan for this - it will make things easier.
*********************************************************************************************************************************
IN PICTURES
I fell in love right away ..with this one.. on the right


It is about time to add eggs..

Farm-fresh eggs...Should I get some hens to have my own eggs?! :)))

..topped with parmesan.

It'd be better if I would use non-stick for this...It got some more tan than I wanted ..but still good.

Other side [of moon] is just perfect!

Tuesday, June 26, 2012

Bahamian Stew

Blog's Category: My Staple Food
Intro
I have discovered this dish several years ago and since then it is on our menu. I do not remember where I've got the original recipe but through several modifications I come to the recipe below.  This stew is very bright, colorful and just packed with good stuff - red pepper, orange sweet potato, yellow specks of corn and dark "eyes" of black beans - this stew is beautiful just to look at it! Well, it's extremely flavorful and tasty also.

Taste Description
It is sweet. And spicy (just a little bit). And a little bit sour from a lemon it served with. And very-very flavorful hence abundance of spices in it.

Variations
- Use any pepper you wish - green, orange or red. I like to put red pepper in it just because of color! If you are not fan of "sweet-ish" stews - use green pepper, it will bring down the sweetness.
- Replace black beans with any type of beans - your call!
- Sometimes I replace half of sweet potato with a regular potato if I want to cut on sweetness (hey, there is a lot naturally sweet ingredients in this recipe!)
- This stew will look prettier if you won't blend it partially as I suggested in the recipe. But we like it partially blended.
- Original recipe called for fresh pineapple. Although, with all my love to pineapple, it is way too sweet with a pineapple . But if you up to that - go ahead and try it!


How to Serve
- It can be served as a soup (then call it a "soup").
- It HAS TO BE served with lemon wedge on a side. Squeeze juice right into your bowl before digging in.
- Blame my Ukrainian genes, but I love it to be served with a spoon or two of sour cream on a top  :))
- This stew is lovely with some sprinkles of chopped parsley or cilantro.

Bahamian Stew

Serves 8-10

5  medium sweet potatoes, peeled, sliced (or diced)
1 large onion, sliced (or diced)
5-7 garlic cloves, peeled and minced
2 tbs olive oil
1.5 tbs salt
2 c frozen corn
1 can black beans
1 tsp dry thyme
1 red pepper, sliced (or diced)
1 tsp ground coriander
1 tsp freshly grated ginger
1 tsp turmeric powder
1 tsp cumin
1 tsp paprika
2 tsp ground red chili pepper

For serving:
lemon
chopped fresh cilantro
sour cream (optional)

- Place a large pot, half-filled with a water, on a heat. Put all ingredients, except beans, into a pot. You can do this gradually, as you cut/dice them or all at the same time.

- Bring to a boil and simmer for about 40-60 minutes.

- Add beans, cook for some 5-10 minutes more. Adjust seasoning if needed and then turn heat off. It's done - enjoy! Wasn't it easy?!

*********************************************************************************************************************************
IN PICTURES
Usually I place pot with water on a heat and then add all ingredients as I prepare them so it's non-stop ongoing process - chopping/dicing/adding and so on.

Thyme goes in..

Half of a huge serving spoon of olive oil = 2 tablespoons of olive oil, right?

...onion comes next..

..then pepper..Oh, it's about to boil. When it's brought to a boil - turn heat down and keep on simmering.

Continue adding other components - turmeric...

..and a cumin..


..and paprika..

..and spicy ground red chili pepper..


It's ready! It can be partially (or completely) blended or left as is. I like to blend it with my immersion blender, just a little bit.

Serve it a with lemon wedge, sprinkled with fresh cilantro and drop of sour cream - heavenly tasty...Well, if you are not used to sour cream in soups, then it's optional (sigh..) but don't you want to try? Lemon is the must though - squeeze juices from a lemon wedge, it will create perfect balance with sweet richness of stew and fragrant lemon sourness.